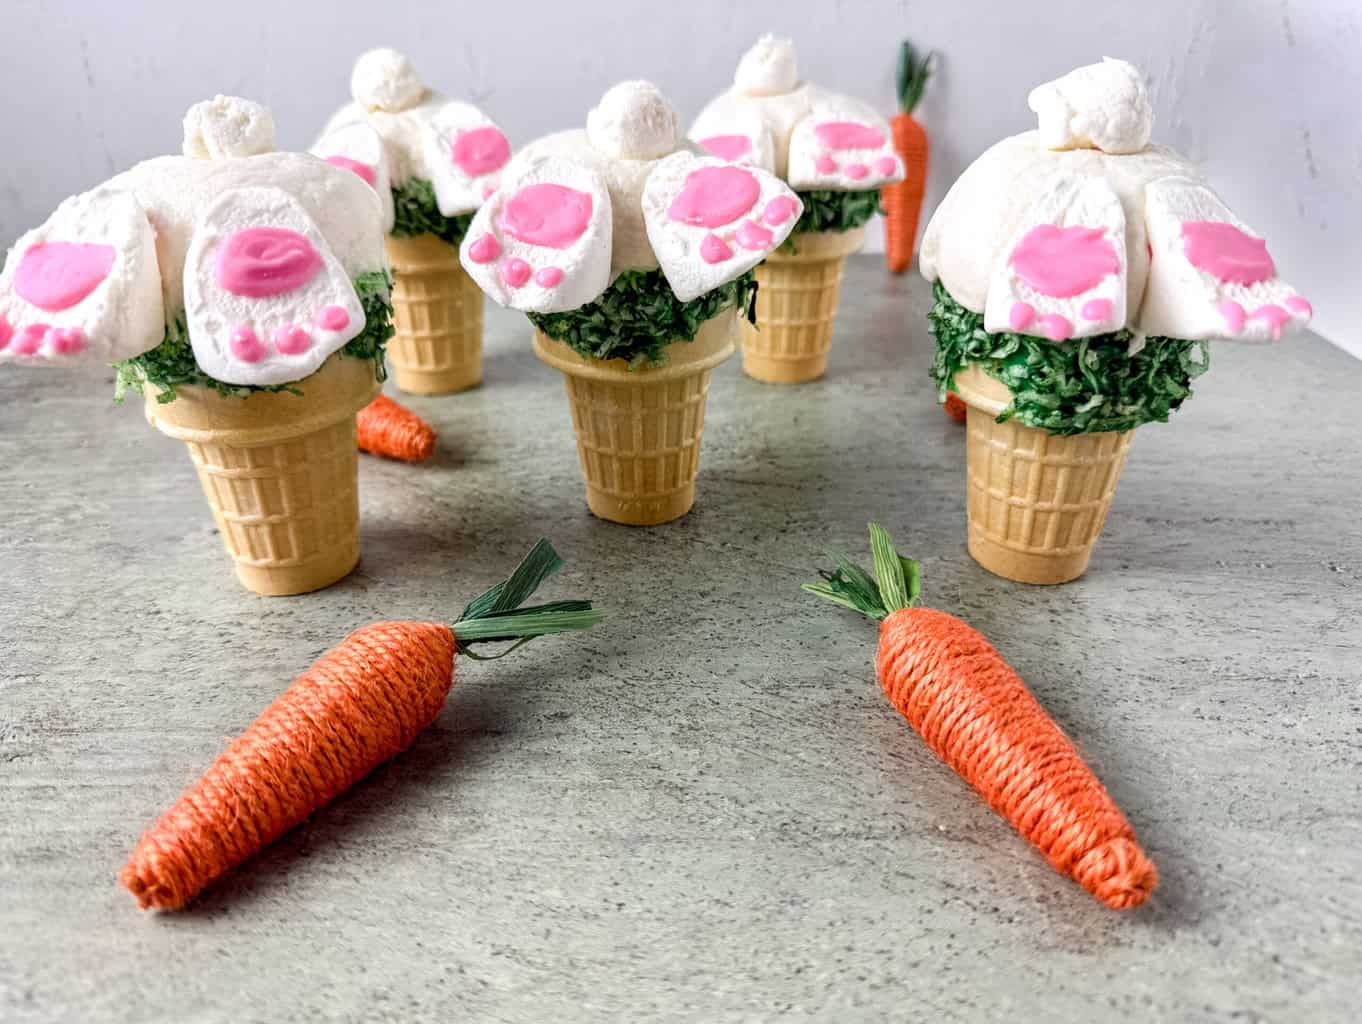
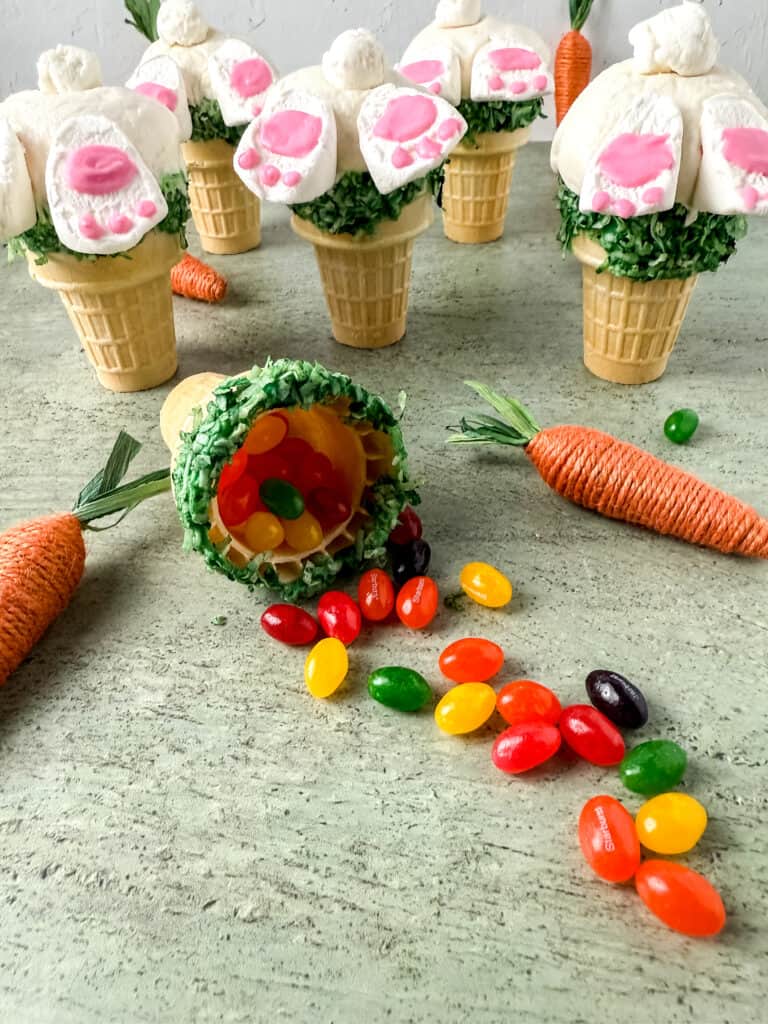
Easter Bunny Butt Ice Cream Cone Cupcakes
These Easter Bunny butt ice cream cone cupcakes make the perfect Easter treat for kids. They have candy in the bottom under the cupcake for an extra special surprise!
These are great little Easter sweets for a class Easter party. My preschool class absolutely loved them when I made them.
If you want some other fun Easter treats, you’ll love my Cupcake Cone Carrots, Bird Nest Treats, Easter Whoopie Pies and EASY Easter Bunny Feet Cookies.
Ingredients You’ll Need For The Easter Bunny Butt Ice Cream Cone Cupcakes
- 6 Any Flavor Cupcakes (My strawberry cupcakes are perfect for these!)
- 10 Ounces White Buttercream
- 6 Jumbo Ice Cream Cone Cups
- 1 Cup Shredded Coconut
- Jelly Beans or other Easter candy
- 9 Marshmallows
- 2 Ounces Green Candy Melts
- 2 Ounces Pink Candy Melts
- 3 Drops Green Gel Food Coloring

How To Make The Easter Bunny Butt Cupcake Cones
Put the shredded coconut in a zipper bag and put 2 or 3 drops of green food color gel into the bag and massage it until all the coconut is green.

Put the green shredded coconut on a sheet of parchment to dry.

Place the green chocolate melts in a microwave-safe bowl, and heat them in 30-second intervals, stirring in between each interval until they are fully melted and smooth. Be careful not to overheat them.

Dip the top of each cone in the bowl of chocolate and roll it around to cover part of the sides. Gently shake off the excess. I tried to do mine about half way down the top section of the cone.

Roll the dipped cone in the green shredded coconut to create a grass effect on the cone. Let them sit for 10 mins to dry.

Pour the jelly beans into the dry cones until about half full and then take the cupcake out of the wrapper and place your cupcake on top of the ice cream cone. If your cupcake is too big for the cone lightly squeeze the cupcake or slice it down so it will fit in.

Using an ice cream scoop, scoop out the buttercream and place it on top of the cupcake. If the shape isn’t perfectly round, let the buttercream sit on the cupcakes for 2 minutes to crust. Then mold the shape with your clean hands.

Warm the pink chocolate melts following the same melting instructions as above for the green melts. Then put it in a piping bag and cut a small hole in the tip.

Cut the marshmallows in half, use the pink melting chocolate to pipe one large circle at the top of the marshmallows and then 3 small circles at the lower end of the marshmallows to make the bunny’s feet. Let them sit for 3-5 minutes to dry. Be sure to only pipe the pink icing on the marshmallows that will be the feet.


Now with the remaining marshmallow halves, roll each one into a ball. These will be used for the bunny’s tail.

Use a tiny amount of the pink chocolate to attach the tails to the top of the cupcake and the bunny’s feet on the bottom edge of the cupcake. Let them sit for it 2-3 minutes to dry.

The bunny butt cupcake cones are complete. Serve and enjoy!

Notes:
These bunny butt cupcake cones are best eaten fresh but they can be stored in airtight container in a cool dry place for 2 days or in the fridge for 3-4 days. Be aware that condensation from refrigerating may cause the cones to break.
Do not let the buttercream hang over the cones because the bunny feet will slowly slip off because of lack of support.
Jelly beans are just a suggestion. You can fill the bottom of the cones with any Easter candy you like.

Easter Bunny Butt Ice Cream Cone Cupcakes
Ingredients
- 6 Any Flavor Cupcakes My strawberry cupcakes are perfect for these!
- 10 Ounces White Buttercream
- 6 Jumbo Ice Cream Cone Cups
- 1 Cup Shredded Coconut
- Jelly Beans or other Easter candy
- 9 Marshmallows
- 2 Ounces Green Candy Melts
- 2 Ounces Pink Candy Melts
- 3 Drops Green Gel Food Coloring
Instructions
- Put the shredded coconut in a zipper bag and put 2 or 3 drops of green food color gel into the bag and massage it until all the coconut is green.
- Put the green shredded coconut on a sheet of parchment to dry.
- Place the green chocolate melts in a microwave-safe bowl, and heat them in 30-second intervals, stirring in between each interval until they are fully melted and smooth. Be careful not to overheat them.
- Dip the top of each cone in the bowl of chocolate and roll it around to cover part of the sides. Gently shake off the excess. I tried to do mine about half way down the top section of the cone.
- Roll the dipped cone in the green shredded coconut to create a grass effect on the cone. Let them sit for 10 mins to dry.
- Pour the jelly beans into the dry cones until about half full and then take the cupcake out of the wrapper and place your cupcake on top of the ice cream cone. If your cupcake is too big for the cone lightly squeeze the cupcake or slice it down so it will fit in.
- Using an ice cream scoop, scoop out the buttercream and place it on top of the cupcake. If the shape isn’t perfectly round, let the buttercream sit on the cupcakes for 2 minutes to crust. Then mold the shape with your clean hands.
- Warm the pink chocolate melts following the same melting instructions as above for the green melts. Then put it in a piping bag and cut a small hole in the tip.
- Cut the marshmallows in half, use the pink melting chocolate to pipe one large circle at the top of the marshmallows and then 3 small circles at the lower end of the marshmallows to make the bunny’s feet. Let them sit for 3-5 minutes to dry. Be sure to only pipe the pink icing on the marshmallows that will be the feet.
- Now with the remaining marshmallow halves, roll each one into a ball. These will be used for the bunny’s tail.
- Use a tiny amount of the pink chocolate to attach the tails to the top of the cupcake and the bunny’s feet on the bottom edge of the cupcake. Let them sit for it 2-3 minutes to dry.
- The bunny butt cupcake cones are complete. Serve and enjoy!
Notes